
How to Write a Check: A Step-by-Step Guide
Today’s digital world has made money transfers and payment of goods and services easier than ever. However, these are not mostly free and either the receiver or the sender must pay transaction fees.
Checks, however, while less common than they used to be, are still widely used as a method of payment. Paper checks are inexpensive and effective for most people. Writing checks is however not something a lot of people do every day. It’s not surprising that a lot of young people have not written a check before.
Writing a check is easy and this article gives a step-by-step guide on how to accurately write one. The steps are not set in stone and you can complete them in any order as long as all the fields are clearly and accurately filled.
Key Takeaways
Before you write a check, make sure you have enough funds in your account to cover the amount you are writing. In the event you do not have sufficient balance, your bank will charge you a non-sufficient funds fee (NSF).
Record the amount, payee, and memo in a check register as part of your records for future reference. Your bank statement will not show many details of the transaction, and the date the check will be cashed by the payee will mostly be different from the date you write the check.
Write the amount both in words and in numbers. Carefully fill in the other fields.
Consider alternative methods such as electronic transfers, and debit and credit card payments if you have the option. Payment by check is cumbersome and is not the fastest way to transfer money.
How To Write a Check
Step 1: Date the check. This is usually on the top right-hand corner of the check
Step 2: Write the name of the payee. Who are you writing the check to? This section is named “Pay to the order of “.
Step 3: Write the payment amount in numeric form aka numbers.
Step 4: Write the payment amount in words.
Step 5: Write the memo. Usually, the purpose of the check.
Step 6: Sign the check.
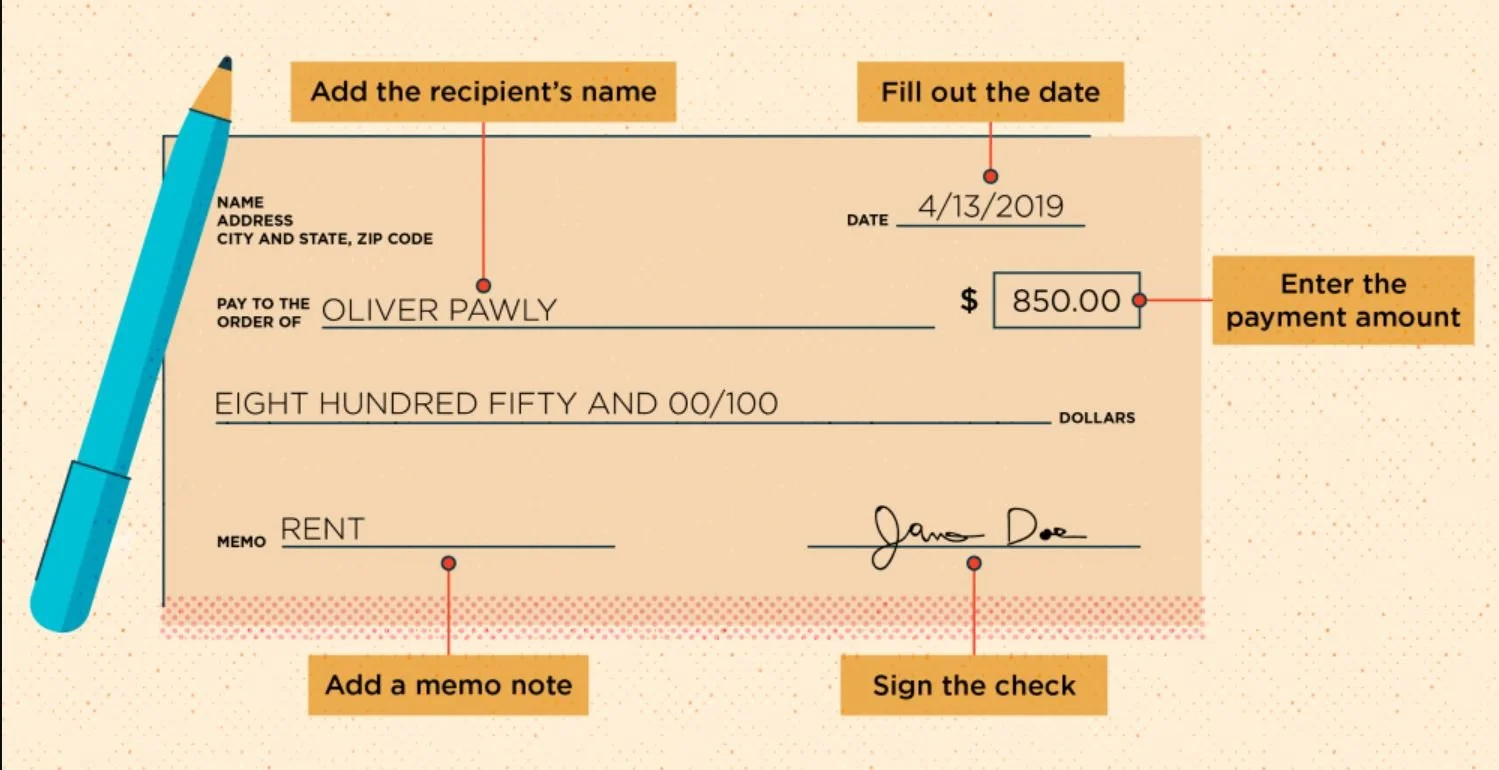
Here is an overview:
Date: This can be today’s date or a future date if writing a post-dated (PD) check. Write this near the top right-hand corner.
Payee: Write the name or organization you are paying in the line that says “pay to the order of”.
Amount in numeric form: Write the amount in numbers on the box on the right-hand side, usually below the date box. For example, 150.85.
Amount in words: Write the amount using words in the box. For example, $150.85 will be written as One Hundred Fifty Dollars and Eighty-Five Cents or One Hundred Fifty Dollars and 85/100. This is usually required to avoid fraud and confusion. If the amount in words is different from the numeric form you entered in the previous step, the amount spelled out in words is used.
Memo: This is written in the “For” line. This is an optional step and does not affect how the bank processes your check. It is used as a reminder of the purpose of the check.
Signature: Place your signature on the bottom right of the check. The signature should be legible and should be the same as in your file at the bank. A check will not be valid without a proper signature.
Tips for Writing a check
When you write a check, make sure it gets used for the intended purpose. Below security tips will ensure you are protected from fraud.
Security Tips
Make it permanent- Use permanent ink instead of a pencil whenever you write a check. If you use a pencil, anybody can erase and alter the details to steal your money.
Draw a line after writing the numeric amount – draw a straight horizontal line after the last number to avoid fraudsters from changing the check amount.
Void any pages with mistakes – It is normal to make a mistake when writing a check. In that event, you will want to void that page by writing the word VOID in capital letters and crossing the check with two parallel lines.
Do not share personal information – never include your SIN number on the check or checkbook even when requested to do so.
No blank checks – do not leave signed blank checks in your checkbook. If your checkbook lands in the hands of fraudsters your bank account will be completely wiped out.
Frequently Asked Questions (FAQs)
When can I sign a check?
You should not sign a check until you have filled in the “Pay to the order of” line. Signing blank checks will leave your finances exposed if your checkbook is stolen.
Can I write a check to myself?
Yes. You can write a check to yourself to transfer money from one bank to another. Use the same process outlined above and pay to the order of your name.